Creating fillable PDFs in Word is an excellent way to streamline data collection and enhance document management. Whether you’re a business owner or a professional, knowing how to make a fillable PDF in Word can save you time, reduce errors, and improve user experience. This guide will walk you through the process, ensuring you can create professional, fillable PDFs with ease.
Why We Should Use Fillable PDFs?
Fillable PDFs offer a host of advantages over traditional paper forms. They streamline data collection, reduce errors, and enhance the user experience by allowing for quick and easy electronic submissions.
Fillable PDFs are environmentally friendly and provide better security for sensitive information.
Fillable PDFs offer several benefits over traditional paper forms:
- Efficiency: Fillable PDFs can be shared and completed electronically, saving time and eliminating the need for physical documents.
- Accuracy: Standardized fields reduce the likelihood of errors, ensuring consistent data collection.
- User Experience: Easy-to-navigate, clean forms improve the experience for clients and colleagues.
- Environmental Impact: Going digital reduces paper usage, supporting eco-friendly practices.
- Security: Fillable PDFs can be password-protected, adding an extra layer of security to sensitive information.
Step-by-Step Guide to Make a Fillable PDF in Word
Creating a fillable PDF in Word might seem daunting, but it’s actually a straightforward process. Whether you’re streamlining business operations or simplifying data collection, this guide will walk you through each step, making it easy to transform your Word documents into professional, interactive PDFs. Let’s dive in and explore how to create fillable PDFs efficiently and effectively.
1. Using Microsoft Word and Foxit PDF Editor Suite
Step 1: Create Your Form in Microsoft Word
- Open a New Document: Start by opening Microsoft Word and selecting File > New Document.
- Design the Form: Enter the text and details needed for your form. Include form elements like lines, tables, or placeholders where fillable fields will be located.
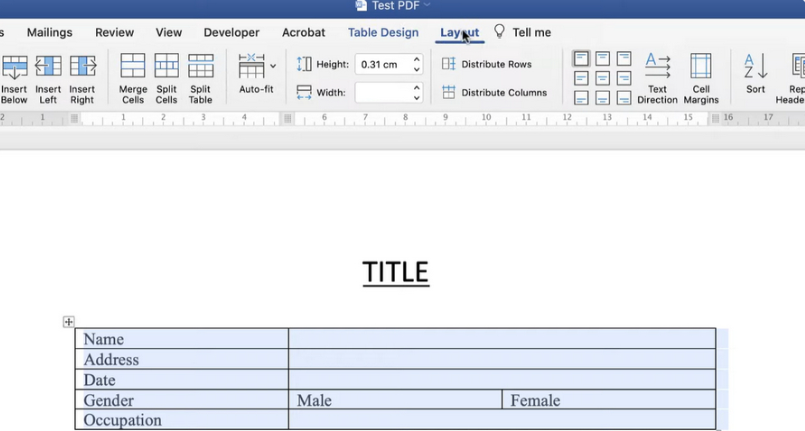
Step 2: Add Form Fields
- Enable Developer Tab: To add fillable fields, you need to enable the Developer tab. Go to File > Options > Customize Ribbon, then check the Developer option in the right-hand pane.
- Insert Form Controls: In the Developer tab, use the tools to add form controls:
- Text Box: Click on Text Box to insert a field where users can type responses.
- Check Box: Use the Check Box tool for fields requiring binary choices (yes/no).
- Combo Box or Drop-Down List: These controls are ideal for fields with multiple predefined options.
- Customize Controls: Right-click on each control to set properties like default text, formatting, or specific options for drop-down lists.
Step 3: Save as a PDF
- Save Your Document: Save the completed form as a Word document first to preserve a copy for future edits.
- Convert to PDF: Go to File > Save As, choose PDF from the list of file types, and save the document.
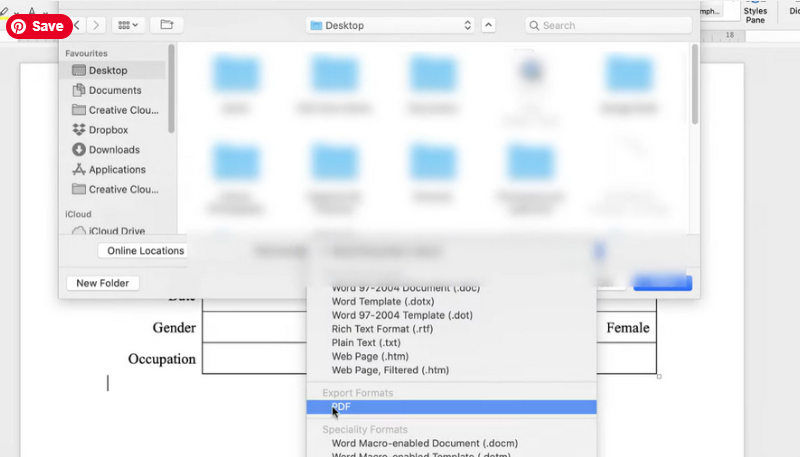
Step 4: Make the PDF Fillable Using Foxit PDF Editor Suite
- Open Foxit PDF Editor Suite: Launch the software and open your newly saved PDF.
- Run Form Field Recognition: Go to Form > Run Form Field Recognition. Foxit will automatically detect and create fillable fields based on your Word document’s layout.
- Edit Fields: If any fields need adjustment, use the form editing tools to add or modify fields as needed.
👉 Also read: How to Translate PDF into Another Language?
2. Using Adobe Acrobat Pro DC
Adobe Acrobat Pro DC offers a powerful alternative for creating fillable PDFs directly from Word documents.
Step 1: Prepare Your Form in Microsoft Word
- Create Your Form: Design your form in Word, just as described in the first method. Save your document.
Step 2: Convert and Enhance in Adobe Acrobat Pro DC
- Open Adobe Acrobat Pro DC: Launch the software and open your Word document.
- Create PDF: Select File > Create > PDF from File, and choose your Word document.
- Prepare Form: Go to Tools > Prepare Form. Acrobat will automatically detect form fields in your document.
- Edit and Enhance: Use the tools in the Prepare Form panel to add or adjust fields as necessary. You can add text fields, checkboxes, radio buttons, and more.
- Save Your Form: Save the newly created fillable PDF.
3. Using Google Forms to PDF
Google Forms offers a simple way to create fillable forms which can then be converted to PDFs.
Step 1: Create a Google Form
- Open Google Forms and start a new form.
- Design Your Form: Add questions and fields as needed. Google Forms supports various field types like text, multiple choice, checkboxes, etc.
Step 2: Convert Google Form to PDF
- Submit a Response: Fill out the form as a test and submit it.
- Print Response to PDF: Open the form response, click on the print icon, and select Save as PDF.
👉 Also read: How to Summarize a PDF Using ChatGPT?
Tips for Effective Fillable Forms
- Clarity and Simplicity: Keep the form layout simple and clear to avoid confusion.
- Testing: Always test the form to ensure all fields work correctly before sharing.
- Consistency: Use consistent fonts and sizes for a professional look.
- Security: Add password protection if the form contains sensitive information.
Conclusion
Creating fillable PDFs in Word, Adobe Acrobat Pro DC, or Google Forms is a straightforward process that enhances document management and user experience. By following these step-by-step methods, you can efficiently create professional fillable forms that are both secure and user-friendly. Embrace the convenience and accuracy of fillable PDFs to streamline your workflows and improve data collection.

Niketa Mulay, a seasoned content writer and editor, has over a decade of experience. With a Master’s in Journalism, she honed her skills at The Times of India and now freelances across various industries. Passionate about reading, writing, and scuba diving, she shares expert PDF guides and tips at PDFdrivehub.com.

